Wednesday, February 20, 2013

Cauliflower pizza crust

Yes, this is all the rage and everyone is doing it. But it's really fairly tasty and worth a shot.

Finished pizza.

Boil one average size of cauliflower. Drain and then squeeze out excess moisture. You can use cheese clothe or a colander for this part. Use your food processor to process the cauliflower. You don't want it to be a paste just broken up fairly well. Add 1 large egg, 1/4 cup of grated Parmesan cheese, 1 tsp garlic salt and 1/4 cup brown rice flour. Pulse mixture till a dough forms.

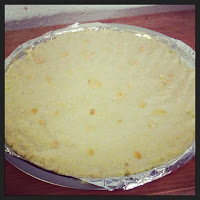
Preheat oven to 350. Oil pizza baking pan and spread the cauliflower dough thinly across the surface. Bake in oven till edges are crispy and golden.

Top with sauce, cheese and toppings on your choice. Bake till cheese is melted and started to show golden spots.

Once you remove the pizza from the oven you need to let it sit and cool for a minute. If you try to just eat the pizza right away the crust may be too soft. I also found this reheats the next day very well.


Pizza crust with garlic slivers on top.

Monday, February 11, 2013

Key Lime Coconut Sorbet & Orange Sparkling Wine Sorbet

Coconut key lime sorbet, pictured
with orange sparkling wine sorbet,
a strawberry sweet wine syrup and
a white chocolate peanut butter heart cup.


Its easy to assume that something like ice cream, sorbet and sherbet would be gluten free, but sadly due to stabilizers with odd scientific names and sweeteners derived from wheat its not so easy to know exactly what you are consuming.

Lately I've been on a mission to not consume anything purchase from a store or restaurant that contains multiple ingedients. I'm hoping this will give wheat less places to hide in my food.


KEY LIME COCONUT SORBET

  • 1 can coconut milk
  • 1/2 cup key lime juice
  • 1/4 cup or more cane sugar (you can add more and determine when the mixture reaches the sweetness level you prefer. 


1. I put all the ingredients into a container and shook it to mix and then dumped the mixture into my ice cream maker. This way when it was done processing I returned it to the container for storage and I had no dirty dishes. 
2. I recommend using the Trader Joes canned light coconut milk for this. When I checked at the store all the other coconut milks had stabilizers and thickeners, including the TJ brand of thick coconut milk. The light coconut milk only had coconut and water as the ingredients so I feel safe eating it. 
This is hands down the best sorbet ever! And also will make for a great popsicle if you do not have an ice cream maker. 


ORANGE SPARKLING WINE SORBET

  • 1 can frozen orange juice concentrate (be sure its only ingredients are orange juice)
  • 1 cup water
  • 1 cup sparkling white white or champagne (if I had used champagne I would have called this a mimosa sorbet but I just had some sparkling wine left around the house.)

1. Mix together all ingredients and pour into ice cream maker. This mix would not make for a good popsicle because the fizz of the sparkling wine or champagne expands as it freezes. This makes for a great light textured sorbet but would make for a mess in your freezer. If you would like to modify this to make a popsicle I recommend using a sweet white wine with no sparkles. 
I know, its easy and hardly seems like a recipe at all, but I think the best things in life shouldn't be hard.

xoxo- Iris

Thursday, February 7, 2013

GlutenFreeda Bean and Cheese Burrito Product Review

 Glutenfreeda Gluten-Free Burrito, Vegetarian Bean and Cheese *** (2.5 out of 5 stars)

I picked one of these up from Sprouts during their large Gluten Free Sale. First off the price on these, on sale $2.50 each is less than impressive. Especially considering the size of the little thing.

Next the ingredients list is a major turn off for me as it has about a million ingredients.

Ingredients:

Gluten-free flour tortilla (white corn masa flour and a trace of lime, water, pregelatinized rice flour, potato flour, high oleic safflower oil, corn starch, xanthan gum and cultured dextrose), refried beans (beans, water, canola oil, salt), rice, cheddar cheese (pasteurized milk, cheese cultures, salt, enzymes, annatto color), salsa (tomatoes, tomato juice, (water, tomato concentrate, salt, vitamin C), onions, bell peppers, peppers, parsley, garlic, cilantro, apple cider vinegar, spices, sea salt, herbs), GMO free corn, sour cream (grade A cultured cream (milk), enzyme), garlic salt (garlic, salt, garlic oil). Contains dairy (milk).

Once I microwaved it the burrito's tortilla broke up in several places and the texture was all around much more like a corn tortilla than anything flour-like. So essentially its a pale wrapped up bean and rice taco.

OK, so I dwelled on the negative so now lets talk about the positives. Those millions ingredients are all recognizible food products and none that I mind with the exception of the xanthum gum (it reads xanthan gum, is that the same thing?) Anyways gums in general, I don't want in my food! However, the burrito tasted just fine, essentially nothing spectacular and what you would expect of a microwaved store bought burrito but good enough that I was able to eat it.

No, I would probably not ever purchase one again, however if I was somewhere and they were offered as an option and I was hungry I would eat it.

xoxo - Iris

Monday, February 4, 2013

Nutella Gluten Free Cupcakes

This recipe has been making the Internet rounds as brownie bites but I made some modifications and gluten freed it for your pleasure. I was wanting to make something I could frost anyways and luckily my modifications also seem to have made it more cakey anyways.

Preheat oven to 350.

In a bowl beat 1 cup Nutella, 3 eggs till combined. In a separate small bowl mix 5 Tablespoons brown rice flour, 1 tablespoon corn starch and 2 tablespoons potato flour with 1/4 teaspoon baking soda. Combine dry and wet ingredients and mix till thoroughly combined, be sure to scrape the bottom of the bowl where Nutella may be hiding.

Line mini cupcake pan with papers and fill with 1 generous tablespoon batter each. Bake for 15 minutes or until the center of the cupcake no longer appears like batter.

Remove from oven and cool.

Meanwhile you can make any kind of frosting you like to top them. I made a Nutella frosting. 1/2 cup Nutella, 3 tablespoons butter, 2 cups powdered sugar, beat with electric mixer till combined, slowly add up to 1 tablespoon milk to achieve appropriate consistency. Now beat the frosting with the electric mixer till it becomes fluffy and the color becomes a shade lighter. This works very well with a kitchen aid and makes a fluffy frosting.

Scoop frosting to bag with tip in place and pipe frosting onto cooled cupcakes.

Try not to eat every one!

Xoxo- Iris


Sunday, February 3, 2013

Vegetarian Gluten Free Chili Pizza - Quick and Easy

I'm not for spicey foods but I do enjoy the comfort of a good warm bowl of chili. It's the best when it's slow cooked from dry beans and allowed to absorb all the wonderful seasonings, however I am going to give you my recipe for 10 minute chili which can come in handy after a long day.

A few days ago I made this with a friend and she and I had it with French fries. It made enough that I had leftovers which leads us to the pizza part of this story.

To make 10 minute vegetarian chili, sauté half an onion chopped, and 2 finely chopped cloves of garlic in about 3 tablespoons olive oil. Once the onions are translucent and the garlic is golden dump in one 29 oz can par drained black beans and one 29 oz can par drained pinto beans. You can use other beans instead like kidney or another combination of dark beans of your preference. Add one can puréed tomatoes, the 16 oz size. I typically do all my seasoning to taste but here is a break down of what I like in my chili: 1/2 tsp cumin powder, 3 Tablespoons smoked paprika, 3 Tablespoons Ancho chile powder, 1 tsp prepared gluten free mustard (Dijon, spices, whatever) and salt to taste, sneak up on it, your canned beans are presalted. You can also add a tiny bit of cayenne pepper to raise the heat level to where you like it best.

Simmer on stove till heated through. If you are making a salad or fries as a side let your chili cook on a low heat for the duration. Do not overcook as the beans will just dissolve but it's nice to let the seasoning simmer.

Serve hot with grated cheese, sour cream and diced onions on top.

Now for how chili becomes pizza...

You can use your leftover chili for this or buy a can of chili or use whatever other chili recipe you have. Be careful that any store purchased chili is gluten free, many contain wheat protein for texture.

I made my hush puppy batter and let it sit while I preheated the oven to 400. Letting the batter sit lets it thicken. Generously oil your pizza pan with olive oil, do not use one with holes. Spread batter across pan thinly but make sure you have no holes. Allow edges to be thicker than the center.

Bake in preheated oven for approximately 15 minutes or till the crust looks baked through but has yet to reach the golden stage.

Dice a quarter of an onion and grate 1 cup of cheddar or Monterey Jack cheese. Remove crust from oven and top with layer of chili. Do not go too thick with the chili just spread over the crust to cover leaving edge bare. Top with grated cheese and sprinkle with diced onions.

Return pizza to the oven and bake another 10 to 15 minutes until the cheese on top starts to bubble and gets hints of browning. Your crust on the outer edge should also be showing signs of goldening. As long as the cheese is melted you can remove pizza from the oven at any point if it seems like the crust might be getting too dark.

Resist the temptation to slice the pizza immediately and let it rest for about 5-10 minutes, this will make it easier to slice.

Once sliced the crust should be nice and thin but easy enough to pick up and eat the pieces with your hands... Or a fork if you prefer. :)

I enjoyed this with a nice home prepared vanilla cola. (Hansen's cola with torani vanilla syrup over ice)
Xoxo - Iris



Friday, February 1, 2013

5 minute Red Chiliquilles

The first time I ever ate chilliquilles was in New Mexico when I was kid, it's funny because for such a simple food it certainly stuck with me. I think I particularly liked that they have something called "Christmas style" which is when your plate is served with green sauce on one side and red on the other... For those not familiar with chilliquilles, it's a popular Mexican dish of fried corn tortillas in sauce served for breakfast topped with shredded chicken or ham and fried eggs.

I'm calling this 5 minute chilliquilles as I'm sure it's a cheat but it's delicious and fast just the same. heat enough olive oil to cover the bottom of your skillet. Toss in 2 finely chopped cloves of garlic. While the garlic seasons the oil cut your corn tortillas into triangles. I used smaller ones so cutting them into four was sufficient but if your have larger tortillas you can cut more.

Toss tortilla pieces into hot garlic oil and sauté until pieces are golden. I used store bought red enchilada sauce, and checked the ingredients to ensure that it was gluten free. Please note Trader Joes enchilada sauce is NOT GLUTEN FREE.

Pour enough sauce into the pan to coat the tortilla pieces and then sprinkle sea slat over and toss again. Serve with fried eggs, chopped cilantro, green onions, a crumbling of quest fresco and sour cream.

It makes for an excellent easy gluten free breakfast but frankly I would eat it for any meal of the day.

Xoxo - Iris